


Experience superior scanning technology with the new Medit i900.


I was a splint blank


In the following, Roman Wolf presents the successful path from the temporary to the definitive implant-supported restoration using a specific patient case and explains the individual working steps in detail.


Finish the temporary restoration quickly, straightforwardly and half-heartedly and then rush into planning and implementing the definitive restoration? You can do that, but you shouldn't!
On the journey to an accurately fitting dental restoration that is esthetically pleasing for the patient, it is indispensable for me to consider the patient's individual wishes, requirements, problems, etc. as early as the provisional phase. In my opinion, the temporary restoration is the pivotal point and an important intermediate step in the fabrication of the definitive restoration. The following case shows how to proceed when planning a temporary restoration and how to combine digital and conventional methods during implementation.

Fig. 1: The initial situation of the patient is recorded in detail.
An important and not to be neglected aspect is to harmonize the dental prosthesis with the individual, dynamic facial expression and posture of the patient. This harmony cannot be achieved on the basis of static models or impressions from the dental practice. Therefore, the patient comes to the laboratory for a consultation in order to describe the initial situation as detailed as possible. In addition to recording his personal situation and wishes, dental photography is used to record the face from all relevant angles. Moreover, further important information can be obtained by analyzing his posture as well as pronunciation. The aesthetic conspicuities that should be taken into account in this case are:

Fig. 2: For the present case, a conventional diagnostic set-up was created in the presence of the patient.
In the presence of the patient, the shape and color of the tooth is determined and then the aesthetic and phonetic alignment is performed. The advantage of this is that the patient can actively participate in shaping how his or her future dental prosthesis might look. Nothing is more individual than the ideas and wishes of a patient. The specification is a good basis for discussion because it reveals to the patient what aesthetic design options are available to us. In this way later surprises can be minimized or completely excluded.

Fig. 3: Transfer of the conventional setup to digital and subsequent coloring.
Based on the analog lineup the set-up was digitized and milled as a dental arch from tooth-colored polymer (DD poly X ML). The advantages of the temporary restoration milled from "one piece" are clear: uniform, homogeneous material properties as well as optimum strength and stability. Thanks to the multilayer process, only minimal finishing is required to create an aesthetically individual touch.

Fig. 4: Detailed view of milled temporary restoration.
On the day of surgery the temporary restoration was remodeled at the implant sites and prepared for insertion. Since this is »only« a temporary restoration, the soft tissue parts were not remodeled in pink polymer.
It has many advantages to solve the aesthetic and phonetic set-up not digital, but in a conventional way. In addition to the personal consultation of patient wishes etc., you receives a lot of dynamic data, which does not give a static model. It creates empathy for the patient on the part of the dental technician to include the patient's demands and wishes form the very beginning. At the same time it promotes trust on the patient side for the work of the dental technician.

Fig. 5: Impressions of finished temporary restoration.
The finished temporary restoration is impressive: stable and aesthetically pleasing with minimal effort. Ultimately, the functionally and aesthetically designed temporary provides us with further important parameters for the final work at the end of the wearing period and thus forms the starting point for the implementation.
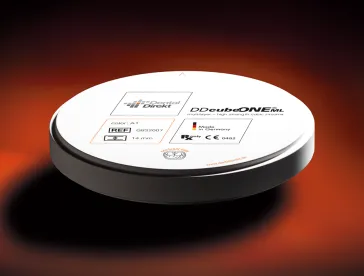
After first dealing with the temporary restoration made of DD poly X ML and describing the importance of the temporary restoration as an important and integral part in the finishing process, we now turn to the completion of the definitive implant-supported zirconium oxide restoration made of DD cube ONE ML H22 in shade A3 after a 6-month healing phase.

Fig. 6: The End of the provisional phase is used for change request in the conventional diagnostic set-up
Although we have already taken the patient's wishes for functionality and optical design into account in the provisional phase, the end of the wearing period is an important interim stage, when the practitioner and patient can jointly check which adjustments still need to be made. Parameters relating to the bite position and jaw relations as well as shaping and shading requirements are often optimized during the implementation of the final restoration. By means of backward planning, the implant restoration has already been planned and implemented in such a way that the denture can be fabricated optimally on it. The great art now consists of precisely transferring the actual situation and adjusting the final details.

Fig. 7: Transfer of the actual situation to the model with a screw-in split pin.
In order to be able to precisely transfer the actual position of the implants to the model, a screw-in cotter pin was created on the initial model. This step is important because the zirconia bridge, which is milled from one piece, does not forgive errors in the sense of deviations and would otherwise break.

Fig. 8: Making an individual impression tray.
The fabrication of the individual tray is also not to be neglected in order to guarantee an accurate transfer. Here, the space conditions for the impression material were created in such a way that there are uniform layer thicknesses of the material. In addition, care was taken to ensure that the tray has complete guidance over the impression posts to the final impression position on the bar. This guarantees that the practitioner can easily find all screw channels and that the tray is not pushed through onto the gums.

Fig. 9: Digitization of the analog lineup
The final set-up was made on the basis of the provisional restoration. In this case, the bite position and jaw relation could be adopted directly. The set-up can be carried out with CAD/CAM support or solely by analog means. This case was solved in the conventional way. Based on the analog set-up, the set-up was digitized. The scanned design was reduced by 0.6 mm in the front and then milled from a DD cube ONE® ML blank. The patient receives a partially veneered hybrid restoration on a zirconium framework.

Fig. 10: Staining of the gingiva part, cut-back in the anterior region with subsequent sintering.
Before the sintering process, the zirconium framework was still optimally finished in its raw state and prepared for layering in the anterior region (cut-back). It is important to use the tools intended for this purpose. As a further step before the sintering process, the gingiva was stained with pink liquids. This created a good basis for the subsequent layering.
In the phase of converting the temporary to the definitive, anything that the patient does not like can still be changed. The temporary restoration is a good basis for discussion. Thanks to the case planning, which was carried out intensively from the beginning, the temporary in this case corresponds almost completely to the patient's ideas; only minimal corrections are made. The patient wanted somewhat more dominant central incisors and somewhat more rounded or feminine shape compared to the provisional.

Fig. 11: Individualization of the construction and subsequent surface design in the anterior region
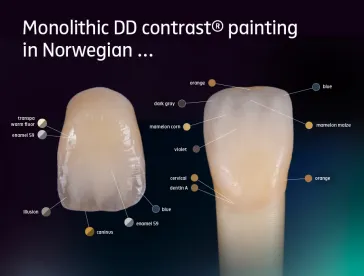
The central incisors were individually veneered up to the canines, as color and light dynamics play an important role in this area. The teeth in the posterior region were finished and implemented using the DD contrast® color and texture system. After the layering process, surface design and shaping and coloring according to the patient's esthetic wishes were started directly.

Fig. 12: Comparison of layered and stained areas
By individualizing with DD contrast® in the posterior region, one comes very close to the noble esthetics of a veneer. The intensive DD contrast® colors can be used to characterize the monolithic posterior teeth and create contrasts. The texture pastes help to create a plastic depth effect and, together with the stains, succeed in adapting the posterior teeth so that they form a unit with the veneered crowns. In addition, DD contrast® can be used to create an "airbag" in the occlusal area, which cushions the high masticatory forces and thus has a positive effect on wear behavior.

Fig. 13: Veneering and surface shaping in the anterior area and individualization of the construction
In the provisional phase, we dealt intensively with the individual wishes, requirements and problems of the patient and only adjusted fine details in the implementation of the definitive restoration. In this way, backward planning played an optimal role in the creation of the dental prosthesis.
From this we conclude: The more intensively one deals with case analysis and planning, the more sources of error can be eliminated on the way to implementation.
Nevertheless, the intermediate stop after the end of the wearing period of the temporary restoration is a good opportunity to compare target and actual data and thus to develop important parameters for the implementation. In my opinion, this successive approach is sensible and necessary on the way to a complete restoration. Only in this way – with great attention to detail and precision – individual works of art can be created for a perfect smile and sense of well-being.

Fig. 14: Patient frontal

Fig. 15: Patient frontal and lateral
Diversity wins.
Dental Direkt – the complete provider in the dental sector
